I've been away from the blog but I've been really busy making new pieces. Since times are so uncertain and a little scary, I thought I'd get back and share some inspiration.
This project began with a very plain, very smooth black faux pumpkin diorama I snagged for about 90% off. It had a lovely black glitter interior and immediately, it made me think of a spooky Halloween night in the woods.
Supplies:
Faux pumpkin diorama
Hard Molding Paste
Sophisticated Finishes Rust Kit
White Gesso
Acrylic Paints:
- Yellow Oxide
- Transparent Burnt Umber
- Quinacridone Nickel Azo Gold
- Quinacridone Crimson
- Phthalocyanine Blue (Green Shade)
Tools:
Metal Pick
Paint Brushes
Plastic Paint Palette
Plastic Paint Cup
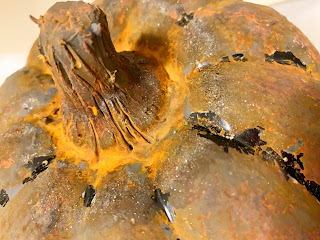
The first thing I had to do for this project was add some texture to the pumpkin and it's stem. There wasn't much product left in my tub of molding paste so I just reached on in and grabbed as much as I could and patted it all over the pumpkin where I wanted dimension. I added quite a bit to the stem and then added striations to it with a metal pick then set it all aside to dry overnight.
Next, I added a heavy layer of the iron paint from the rust kit over the molding paste. After it dried, I brushed on the rusting solution and set it aside overnight again.
I dry brushed on the gesso and let it all dry again.
I had to really fiddle with the color wash over the pumpkin part to find colors I liked. Basically, I started with just a wash of the crimson, but it just looked pink. I added quite a bit of the nickel azo gold and made it a thicker wash - perfect! As that layer dried, I added more crimson to the wash and added this shade in a few spots to give a more varied coloration overall.
Once the pumpkin was dry, I moved to the stem. I blended the blue and yellow oxide to create a deep, mossy green. I dry brushed this over the stem and once dry, I added some burnt umber to darken it up and added some low lights.
Now that it is dry, I let my mind wander and came up with this little vignette to go along with the trees. Next step is to create a unique light source and add all the interior bits and pieces.


Comments
Post a Comment