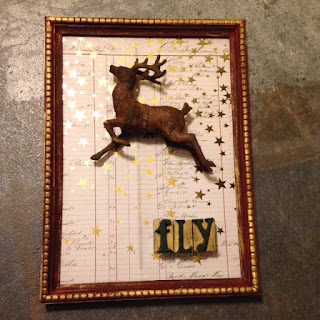
I decided that this year I will "make do" with the crafty supplies I already have. There's only so much space in the Pit of Despair! This project came together really quickly and while I used a vintage plastic reindeer, a new version can be substituted.
Supplies:
Tim Holtz Vignette Panel (largest size with backer board)
Tim Holtz Christmas Stack golden star paper
Tim Holtz Typography letters 'FLY'
Tim Holtz Alcohol Ink Gold Mixative
Tim Holtz Distress Stain in Walnut Stain
Tim Holtz Matte Medium
Glossy Accents
Red acrylic paint
Dark green acrylic paint
Vintage plastic reindeer
Sophisticated Finishes Rust paint
Four felt adhesive dots
Tools:
Scissors
Paint brushes
Cotton swab
Months ago, I nabbed a bag of vintage plastic reindeer at an antique shop and decided to rust one to see how it would look. I coated it in two layers of iron paint and then added the rusting agent. I liked how it looked and set it aside for later.
While organizing my hoard, I spied my Vignette Frames and an idea took root. First, I found the lovely paper with the golden stars and dry fitted it to the backer board and added the rusty reindeer. I removed the paper and added a layer of Matte Medium to the board then smoothed the paper over top. Once dry, I trimmed the sides of the paper flush with the board and set it aside.
Next, I added two layers of red acrylic paint to the frame itself. It was a bit bright, but I planned to tone it down.
I added the Distress Stain over the frame and let it dry. The frame took on a nice deep tone.
Next, I painted the Typography letters with the green paint. The wood was so dark, I decided to add a few drops of the Gold Mixative to a cotton swab and colored the backgrounds. The letters popped a bit better.
The frame needed some 'pop' too so I added more Mixative to the swab and rubbed the raised design and the flatter surfaces.
While that dried, I painted the sides and back of the backer board with the green paint to tie it all together.
Supplies:
Tim Holtz Vignette Panel (largest size with backer board)
Tim Holtz Christmas Stack golden star paper
Tim Holtz Typography letters 'FLY'
Tim Holtz Alcohol Ink Gold Mixative
Tim Holtz Distress Stain in Walnut Stain
Tim Holtz Matte Medium
Glossy Accents
Red acrylic paint
Dark green acrylic paint
Vintage plastic reindeer
Sophisticated Finishes Rust paint
Four felt adhesive dots
Tools:
Scissors
Paint brushes
Cotton swab
Months ago, I nabbed a bag of vintage plastic reindeer at an antique shop and decided to rust one to see how it would look. I coated it in two layers of iron paint and then added the rusting agent. I liked how it looked and set it aside for later.
While organizing my hoard, I spied my Vignette Frames and an idea took root. First, I found the lovely paper with the golden stars and dry fitted it to the backer board and added the rusty reindeer. I removed the paper and added a layer of Matte Medium to the board then smoothed the paper over top. Once dry, I trimmed the sides of the paper flush with the board and set it aside.
Next, I added two layers of red acrylic paint to the frame itself. It was a bit bright, but I planned to tone it down.
Next, I painted the Typography letters with the green paint. The wood was so dark, I decided to add a few drops of the Gold Mixative to a cotton swab and colored the backgrounds. The letters popped a bit better.
The frame needed some 'pop' too so I added more Mixative to the swab and rubbed the raised design and the flatter surfaces.
While that dried, I painted the sides and back of the backer board with the green paint to tie it all together.
I glued the letters and reindeer to the board with Glossy Accents and when everything was dry, I glued the frame to the backer board.
Once dried, I added four felt dots to the back of the piece. At some point, I might add a metal picture hanger to the back.
This was a fun little make and gives me a few more ideas!


Comments
Post a Comment