While cleaning out my office a while back, I re-discovered a Shrinky Dink I made of a conjoined twin skeleton. Inspiration struck and I painted some panels and made more Shrinky Dinks to accompany the skeleton, then life got in the way of crafting and the bits sat on my desk. I decided today's Snow Day task would be to finish these Creepy Panels.
 |
| The finished product! |
The bases of these unique wall hangings are Tim Holtz Burlap Panels with a layer of black acrylic paint.
I used the same black paint to dry brush the fronts of Tim Holtz Vignette Panels and painted their sides solid black.
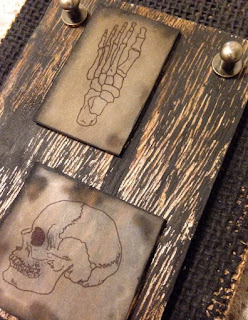
While paint dried, I broke out my Shrink Dink paper and traced out old anatomical drawings of skulls, bones, and even a spider using a black Sharpie marker. I cut them out and baked them to make cool tiles.
 |
| Completed Shrinky Dink tiles |
The white wasn't working for me so I used Tim Holtz Alcohol Ink in Mushroom on the shiny side of the plastic to give it an aged look. The skull in the lower right corner was a boo boo - I added the Alcohol Ink to the matte side and the ink started to react with the Sharpie. I like the effect though, and will use it for something else. (Note: the conjoined twin tile is colored with Teakwood diluted with Blending Solution to make it a light brown)
 |
| Nicely aged and grungy! |
I added black acrylic paint to the edges of the tiles and chose which ones would work on the Vignette panels. I wanted to use wingnuts to secure the wood panels to the burlap panels, but couldn't find any I liked.
After searching a while, I found the Tim Holtz Hitch Fasteners. The screws that came with them were too short, but I had Tim Holtz Long Screws left over from a few other projects, so I swapped them out.
I used my rotary tool to drill holes through both panels.
 |
| The rotary tool is a handy tool to drill holes through the panels! |
The Hitch Fasteners bring a bit of depth that I really like and the soft finishes are a nice touch too!
 |
| The Hitch Fasteners are a breeze to use |
I used dabs of E-6000 adhesive on the backs of the plastic tiles to adhere them to the wood panels.
 |
| This grinning skull is fun |
 |
| The bones of the foot and a side-view of a skull |
 |
| I love this panel most of all |
 |
| It is amazing how much detail you can see once the plastic has shrunk! |
 |
| Close-up of the foot |
I may go back and add a few other doodads to the panels, but I really like how they turned out! I've got more Shrinky Dink paper so I think some lazy Saturday I might make more tiles.


Comments
Post a Comment