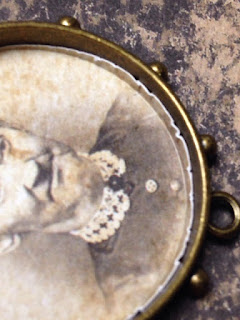
Today's project is a fun necklace that has me singing 'Poison' by Bell Biv Davoe. I love the sheet of Tim Holtz's scrapbook paper with the creepy old photographs and the photo I selected just looked extra creepy to me. I didn't have my Vagabond cutting machine with me so I had to cut out the photo by hand.
Supplies:
1 Bezel (I used a Susan Lenart Kazmer Hobnail Bezel which are sadly discontinued)
1 Skull and crossbones charm (brass finish)
Satin cord
2 Jump Rings (brass finish)
Tim Holtz Ephemera Pack Curiosities
Tim Holtz Halloween paper stack
Glossy Accents
Tools:
Jeweler's pliers (one or two pairs, depending on your preference)
Scissors
Instructions:
1. I couldn't get a great action shot, but to get the outline of the bezel on the photo, I lay the bezel face-down on top of the image I wanted and then pressed the paper firmly over the bezel lip from below. I went over the lip a few times, pressing firmly. A ghostly impression appeared. I cut on the inside of the impression and dry fitted the paper into the bezel.
2. I used my fingernail to really press the paper into the bezel and get a good cut line. I popped the paper out using my pliers.
3. More quick work of the scissors made a decent fit.
4. I added squiggles of Glossy Accents to the inside of the bezel and then added the photo back, smoothing out any air pockets and arranging it in line with the rings of the bezel.
5. The ephemera I selected was too big for the bezel so I did a bit of rough cutting to make it fit. I glued that down with Glossy Accents as well.
6. I opened a jump ring by clasping it in the pliers with one hand and holding it firmly between my thumb and index finger of my other hand. I gently twisted the pliers away from me and the jump ring opened. I then slid it onto the hole of the skull and crossbones charm and then through the bottom ring of the bezel. I closed it using the opposite twisting motion and made sure it was completely closed.
7. I opened the second jump ring the same way and slid it onto the top ring of the bezel and closed it the same way.
8. Next I cut a piece of satin cord. I made mine about 32 inches long so I could slide the finished necklace over my head.
9. I threaded one end of the cord through the top jump ring.
10. I lined up my ends and make an overhand knot.
And there's a finished necklace! I want a bit more jazz for this project so when I get home, I'm going to add some fine black glitter.
Supplies:
1 Bezel (I used a Susan Lenart Kazmer Hobnail Bezel which are sadly discontinued)
1 Skull and crossbones charm (brass finish)
Satin cord
2 Jump Rings (brass finish)
Tim Holtz Ephemera Pack Curiosities
Tim Holtz Halloween paper stack
Glossy Accents
Tools:
Jeweler's pliers (one or two pairs, depending on your preference)
Scissors
Instructions:
1. I couldn't get a great action shot, but to get the outline of the bezel on the photo, I lay the bezel face-down on top of the image I wanted and then pressed the paper firmly over the bezel lip from below. I went over the lip a few times, pressing firmly. A ghostly impression appeared. I cut on the inside of the impression and dry fitted the paper into the bezel.
2. I used my fingernail to really press the paper into the bezel and get a good cut line. I popped the paper out using my pliers.
 |
| That sharp crease is one reason my nails are a hot mess right now |
3. More quick work of the scissors made a decent fit.
4. I added squiggles of Glossy Accents to the inside of the bezel and then added the photo back, smoothing out any air pockets and arranging it in line with the rings of the bezel.
5. The ephemera I selected was too big for the bezel so I did a bit of rough cutting to make it fit. I glued that down with Glossy Accents as well.
6. I opened a jump ring by clasping it in the pliers with one hand and holding it firmly between my thumb and index finger of my other hand. I gently twisted the pliers away from me and the jump ring opened. I then slid it onto the hole of the skull and crossbones charm and then through the bottom ring of the bezel. I closed it using the opposite twisting motion and made sure it was completely closed.
7. I opened the second jump ring the same way and slid it onto the top ring of the bezel and closed it the same way.
8. Next I cut a piece of satin cord. I made mine about 32 inches long so I could slide the finished necklace over my head.
9. I threaded one end of the cord through the top jump ring.
 |
| Add caption |
10. I lined up my ends and make an overhand knot.
 |
| Line up those ends |
 |
| Wrap around...look at what crafting can do to your fingers! |
 |
| Through the hole...pull...sorry about those nails... |
 |
| Perfect bunny ears! |
And there's a finished necklace! I want a bit more jazz for this project so when I get home, I'm going to add some fine black glitter.
 |
| She just looks like she is bad news |


Comments
Post a Comment